
Troubleshootings by Dr.Pavoni
![]()
![]()
![]()
![]()
![]()
![]()
![]()
![]()
(for any trouble you can write to info@francescoceccarelli.eu)
TROUBLESHOOTING THE ELECTRICAL SYSTEM
Troubleshooting the electrical system is where you need the most help. The main tool needed here is a multi-tester, which can be bought at any home center or hardware store. You don't need anything expensive. The cheaper the better for these tests. An analog version works just as good as a digital display. You can also use a self-powered test light. Luckily, the electrical circuit is pretty basic, with no circuit boards! With some basic tests, you can track down the problem very quickly. All tests will be continuity tests, which is checking for a complete circuit. The exception to this is checking for power at the (AC) wall outlet. See your manual for AC settings. You have to know when continuity is bad, and when it is good. A circuit or component showing continuity could have a short in some circumstances. The following instructions will tell you what you're looking for. The actual readings you get on the multi-tester are not that crucial. What you're looking for is an open circuit reading (OL). The following tests will not hurt your la Pavoni, if done correctly. Since there is no AC applied to the circuit, you can't get shocked. The one main thing that you have to be careful about is when you disconnect wires. Put them back in the original position! Finally, if you are the least bit hesitant, take your machine to an electrical shop, and see if they will diagnose, and/or fix the machine for you. Finally, don't assume that there is only one faulty part. Do all of the checks on every component. One part may go bad, and in turn blow another component in the circuit. Remember, if you used your multi-tester to check for AC, switch your multi-tester back to the continuity/resistance settings for the rest of the tests.
If you plugged your la Pavoni in, and it didn't heat up, there are a number of things that could be wrong. No power to the outlet that you're plugged into, the fuse in the machine has blown, the switch is bad, the heating element is burned out. You may have a bad power cord, or a bad connecting wire in the circuit. Also don't overlook a disconnected wire. Don't freak out. These tests can be done very quickly and easily. For the most part, you can be certain that the fuse in the machine has blown. This has accounted for 99% of my electrical problems with the machine. All tests are done with the power OFF. Be sure that the machine is UNPLUGGED before you start to troubleshoot, and that the boiler is empty of water. Let's not get shocked, or worse yet, electrocuted. Espresso isn't that good to die for! Or is it?? (:})
Your multi-tester should be on the continuity or resistance measurement settings for all tests. The black lead goes into the COM (-) jack and the red lead goes into the OHM (+) jack. The symbol for the OHM looks like a horseshoe on the front panel. If you're using an analog tester, the doubler switch should be on the V-OHM-A setting. Not the V-A/2 setting. The selector switch should be on the RX1 position. You should always adjust your needle to the "0" ohms. Do this by touching both leads together and use the OHMS adjustment dial. These instructions are pretty common to all analog testers. You should never get a reading with an analog tester that the needle moves to the extreme right of the scale, past the "0". With the digital displays, you won't have to do the previous adjustment. Lastly, read your instruction manual and go by that if it differs from the above instructions. Just setup your tester for a continuity/resistance reading and you'll be O.K. One last comment. When you are doing your tests, make contact with the test probes or alligator clips only on the component or area of the component that you want to test. For example, if you are testing for a bad power cord, make contact with only one prong on the plug and one of the disconnected leads. Do not touch any other metal surfaces. If you are testing the switch, make sure you are touching only the two terminals of the circuit you want to test. If you don't, you will not get a good reading from your multi-tester.
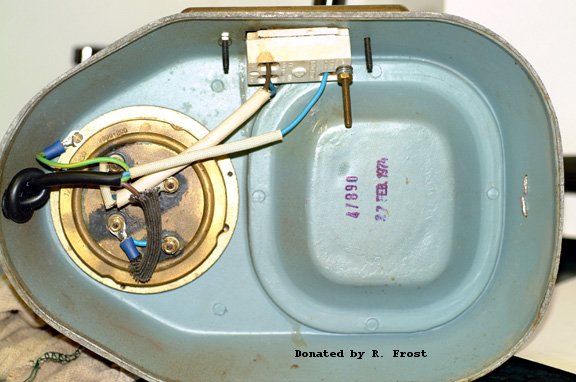
For all electrical tests unplug the machine, and empty the water out of the boiler! Place the machine on top of a protective work surface like a towel, cardboard, etc. You'll need a large philips screwdriver or Torx® screwdriver, multi-tester, needle nose pliers, and a flat head screwdriver. Take out the drip tray, and unscrew the retaining screw in the bottom of the cavity. Older machines have a philips screw in the drip tray or the screws may be on the sides of the base. The newer models have a Torx® screw.
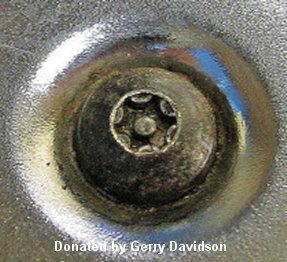
Your machine may have the Torx® security screw. If you look at the screw, it is star shaped and has a small pin that is in the middle of the screw. You will need a T20 security bit
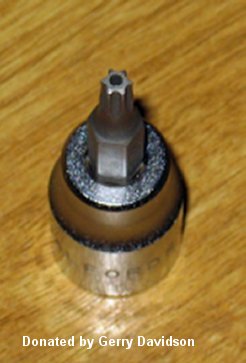
to remove the screw. I've been told that Pavoni is using T25 screws in the newer Stradivari machines so it's best to buy a set of bits to cover yourself no matter what machine you own. You can readily find these bits on the Internet. This screw holds the bottom to the machine. The bottom of the machine can now be taken off. Be careful, there is a little mounting tab on the back which fits into a slot in the back of the machine. Just grab from the front, and let the bottom fall as you bring it forward. You don't want to break the plastic tab off the bottom. Now at this point, you have full access to the electrical system. From here all of your tests can be done. It is also advisable to get your digital camera out and take some pictures of inside the base. This could be a useful aid in getting your wiring back to their original positions on the other components. At this point, check for a disconnected wire. See (VISUAL AIDS) for a wiring schematic for the Pavoni. If you find no disconnected wires, perform the following checks:
IF YOU PLUGGED YOUR MACHINE IN, AND IT DIDN'T HEAT UP, PERFORM THESE STEPS:
Make sure you have power to the outlet that your machine is plugged into. You can use your multi-tester for this, or plug in an appliance like a radio, and see if they operate. Do not use the continuity settings to check for AC power! Read your multi-tester manual on how to check for AC voltage. If nothing works, the power is off to the outlet. This may have been caused by a component in the la Pavoni blowing, or another appliance, that was plugged in previously to that same outlet that flipped the circuit breaker in your home. If it is plugged into a GFI outlet, press the reset button on the outlet. If you don't have a GFI, go and check your circuit breakers. Reset any circuit breakers. Test now for power to the outlet. If still no power, and all circuit breakers are not flipped, you may have a bad outlet or a bad connection at the outlet. If you are comfortable working with electricity, take off the cover plate and examine the outlet for problems. If not, call an electrician. If you have power, plug your la Pavoni in again. If the circuit breaker flips again, then the problem is in your la Pavoni. If the circuit breaker doesn't flip, and you have power to the outlet, and the machine still doesn't heat up, yes you guessed it, there's a problem with the la Pavoni.
IF YOU PLUGGED YOUR MACHINE IN, AND THE MACHINE STARTED TO HEAT UP, BUT SHUT ITSELF OFF, PERFORM THESE STEPS:
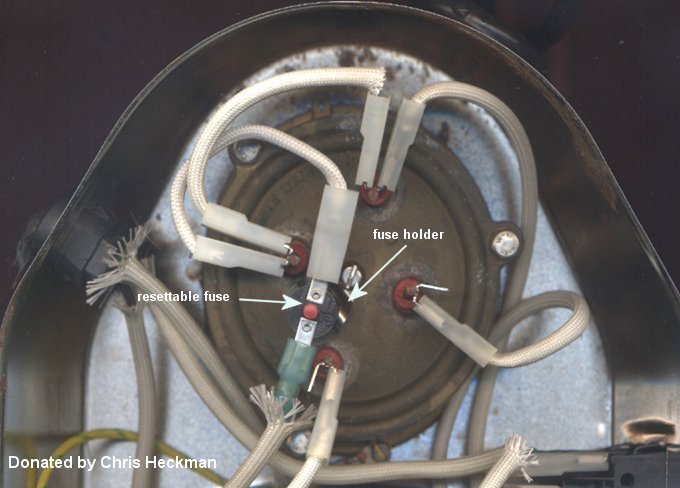
This is a classic symptom of a machine that needs to be descaled. See the Maintenance Section under Monthly for descaling procedures. Some machines have a resettable fuse.
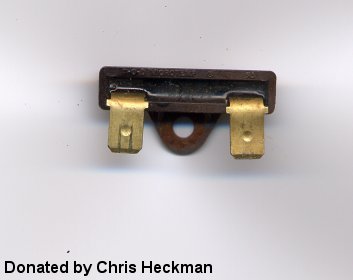
If you have a resettable fuse, you won't have to replace the fuse, just take the bottom off and push the red button back down and descale your machine. That should fix the problem. On newer machines you don't have to take the base off. There is a rubber plug on the bottom that you remove to reset the fuse. Remove the plug and take a pencil (eraser end) and push the red button down till it clicks. The fuse is now reset. The Europiccola and Professional owners , who don't have a resettable fuse, will have to perform the following tests. It's possible that the resettable fuse is also bad so you should do the following test just like on a regular fuse. Make sure that the red button is pushed down for the test. Do the above check for A/C power. If you have power at the outlet, then locate the fuse. The fuse is on the bottom of the heating element. It's plastic with two terminals coming out of it. A resettable fuse is in the same place but has a red reset button in the middle of the fuse. Unplug the wires from either end of the fuse, and attach each lead from the multi-tester to each end of the fuse. Either end is fine, there's no polarity condition here. If the fuse is blown, you'll get no reading at all (OL) on the multi-tester scale . If no reading, the fuse is blown and you'll need to replace the fuse. The needle on the analog testers, if the fuse is bad, will not move at all. It will sit on the left side of the meter. If you have a reading
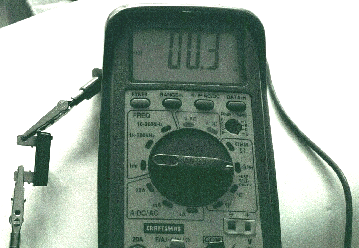
of approximately .3 OHMS , it's not the fuse, and you can go down to the next section for more troubleshooting hints. On analog testers, the needle will move to the right on the scale, if the fuse is good and it will lie just to the left of the "0". If the fuse is bad, remove the retaining screw from the fuse and remove the fuse from the bottom of the heating element. You'll have to bend the terminals on the new fuse,
or the bottom won't fit on. Use some needle nose pliers to accomplish this. I think on the Professional model, you won't have to bend the terminals. Just hold the fuse in one hand, and gently bend the terminals in the direction of the mounting tab. There is also a small positioning tab on the bottom of the fuse that goes into a hole in the bottom of the heating element. Put the locking washer on first, then tighten the retaining screw down. Make sure the positioning tab is in the hole before you tighten the screw down. Connect the wires back to the fuse. Assemble the bottom back in, and fill the boiler back up with water. Turn the machine back on. Chances are you will have fixed the problem. If not, you have another problem. If the fuse was blown, do an immediate descale of your machine after installing the new fuse. The new fuse will also blow if you have a build up of deposits on your heating coil.
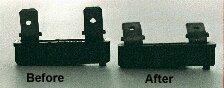
You can retrofit
to use a resettable fuse in the Europiccola that came with a brown fuse (unresettable)
. You need to order the fuse holder along with the resettable fuse. The fuse holder gets mounted on the heating element by the orginal screw that was used to hold down the brown fuse. The resettable fuse slides into the holder. It is a very tight fit and you want to make sure no component touches another component. You could short out the machine. I would use fiberglass sleeving or silicone sleeving on any metal part that may touch and cause a short in the circuit.
NOTE: On some older Pavonis a different kind of fuse was used in the machine. A thermal fuse that was installed in the circuit. One of the places the fuse was in went in a cavity
in the middle of the heating element. The other place was on the surface of the element under a hold down strap.
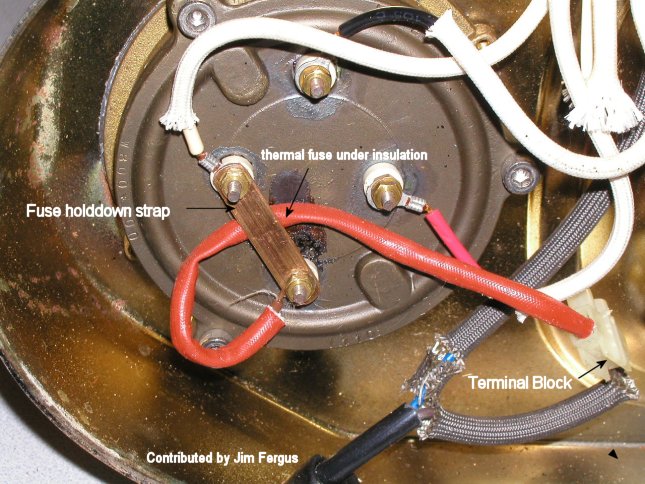
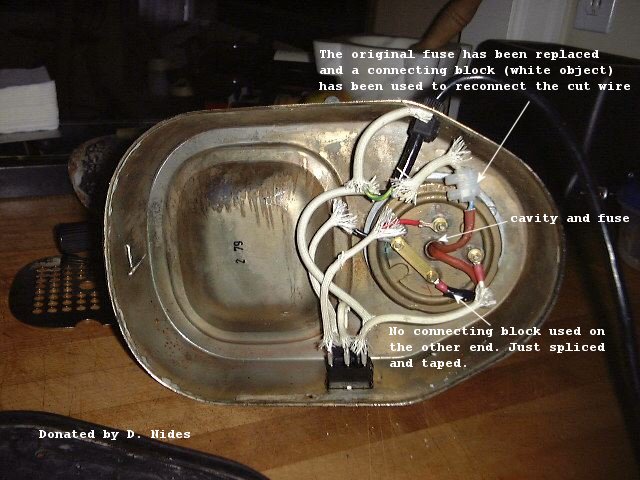
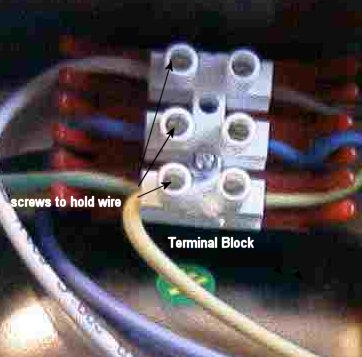
This fuse may be a little harder to test to see if has blown because it's a inline fuse. That means that it is hard wired in the circuit. No solderless terminals to pull off. To test it, you would have to disconnect it from the the circuit. Most Pavonis with this type of fuse have at least one terminal block that a fuse lead is connected. Disconnect the fuse wire going to the terminal block or blocks. If both leads from the fuse go to terminal blocks just disconnect each lead and test it as stated in the above paragraph. If only one lead has a terminal block disconnect it from the terminal block and disconnect the lead going to the heating element and then you can test it. I don't know if Pavoni still makes the replacement fuse. A suitable replacement (SKU#2701322)
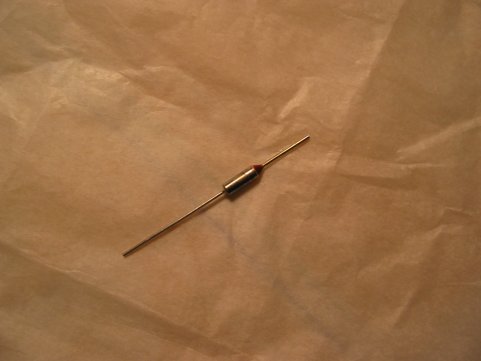
can be found at Radio Shack stores. It's a 262.4° F (128° C) fuse. Be careful on installing this in the machine. It must not touch the cavity or heating element without some type of insulation around it or you could get shocked and definitely you are going to create a short in the machine. It's like touching a bare live wire. You'll blow a fuse and probably destroy the switch in the machine. Try and reuse the existing silicone insulation that came with the original fuse. Try not to use crimp on butt connectors on the fuse leads. Crimp on terminals are not used for solid wire, just stranded wire. Soldering is not advisable since you could blow the fuse in the process of soldering it to a terminal or another wire. The soldering gun produces too much heat. If you do apply solder to the butt connector after crimping, test the fuse afterward for continuity. Try to solder as far away from the fuse as possible. You could use some alligator clips as heat sinks while soldering. Just put the alligator clips on the fuse wire between where you solder and the fuse itself. This may help dissipate the heat away from the fuse. You'll have to use a terminal block
if one isn't already on your machine. Lastly, if you are looking for this type of thermal fuse on your machine and can't find it, it's probably because the prior fuse blew and the previous owner didn't replace it. It's time to take a trip to Radio Shack. You'll also need to purchase some silicone insulation.
IF YOU HAVE POWER, AND THE FUSE SHOWS TO BE O.K., PERFORM THESE STEPS:
Check the power cord, it may be bad. The machine should be unplugged, and the leads of the power cord disconnected from inside the machine. Note where the inside leads are connected. Your wiring may be different than mine so note where your wires are connected inside the base. Put one lead
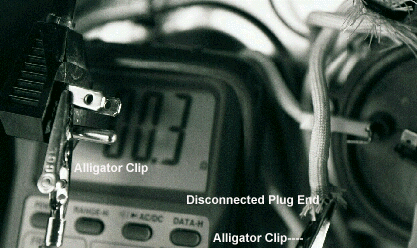
from the tester to one of the disconnected leads inside the base and touch one prong on the power plug with the other tester lead. Then touch the other prongs,

respectively. You should get a reading only when one of the prongs is touched. Try the test on the other disconnected leads. If you get more than one reading when alternating from prong to prong, on a one lead test, there is a short in the cord, and the power cord needs to be replaced. Starting at one end of the cord and working down, slightly wiggle the cord. Make sure you move the wires that go through the plastic grommet that is attached to the base. I would try to push or pull the power cord either into or outside the base a small distance. The grommet may be holding the wires enough that they won't touch each other and it would prevent giving you a short indication. You may need another person to do this test, if you didn't get alligator clips with the multi-tester. You do this wiggling in case there is a short in the cord and it takes a little movement for the wires to touch inside. If you get no reading at all from testing any of the prongs, the cord is bad. If the power cord checks out to be O.K. then probably it is the switch that is bad and you can skip down to the next paragraph. If you find the cord is bad, don't buy a Pavoni cord unless you have a lot of money in the bank! The last time I checked the price was $60. I used an old power cord from a IBM printer. Buy a power cord for a computer power supply for the replacement. The original power cord that was on my Pavoni was rated 18-3 SJT. This means the cord has three wires, hot, neutral, and ground. The wires are 18 gauge stranded copper and has a thermoplastic outer jacket. There is really nothing really special about the cord. A power cord for the power supply on a computer will be more than enough to handle the requirements of your Pavoni. The heating element draws about 8 AMPS and the power cord mentioned above is good for 10 AMPS. You could go to a 16 gauge cord, anything more would be overkill. One thing to check is the outside diameter of the cord. It has to go through the grommet on the side of the machine. The replacement cord I chose fit perfectly through the grommet hole. It's o.k. to be a little small on the cord diameter but you want to make sure the cord will fit the grommet hole. To replace the bad cord, disconnect the three leads from inside the machine. They probably would be disconnected anyway since you did this test. Cut off the terminals of the bad cord and pull the cord out of the machine. Once you get your new cord, cut off the connector
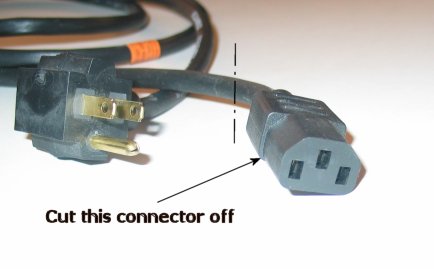

as a guide on how much outer insulation to strip off. Now using your crimping tool, crimp on some insulated terminals on the black and white wire. My Pavoni had a long ground wire that was attached to two places in the machine. It was still good and I wanted to use it with the new power cord. It saved me crimping on one more ring terminal along with new wire to use as the ground. Cut off the ground wire from the old cord and crimp that to an uninsulated ring terminal along with the ground wire of the new power cord. Since the wires on the new power cord had no insulation for heat, I used some fiberglass sleeving on the new wires
to protect them from the heat of the heating element. You could wrap some electrical tape around the power cord insulation where the cord comes through the grommet. This may provide some strain relief on the cord if you happen to pull on the cord from outside the base. It's a little work to make up a new cord but it sure beats paying $60! Look in REMAINING CHECKS below to see how to use a wire crimper if you don't know how they work.
TROUBLESHOOTING THE TWO TOGGLE BLACK SWITCH (SEE NOTE ON WHITE SWITCH TESTING)
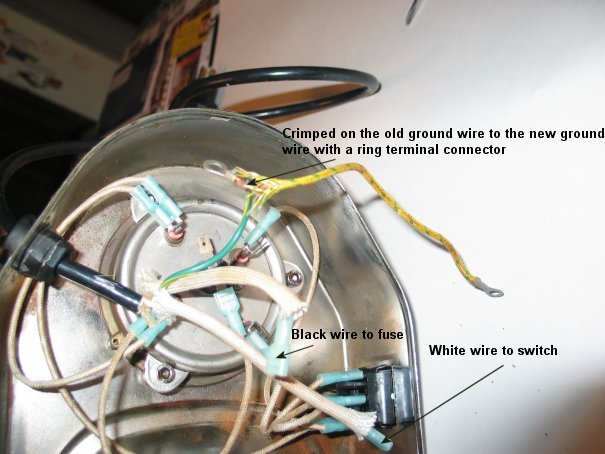
Disconnect all wires to the switch. Note where all wires are attached. I can't emphasize this enough. Make a crude drawing. You'll be glad you did if your memory isn't what it used to be! Every terminal on the switch is numbered.(see VISUAL AIDS) You may have to take the switch off to see them, but they are there. You can remove the switch from the machine, or leave it in place to do this test. If you remove the switch, depress the plastic retainers on the sides of the switch. You may have to wiggle the switch back and forth to get it out. The upper switch (red) supplies power to the machine. It also supplies power to the lower (white) switch. Perform a continuity test to the upper (red) switch.
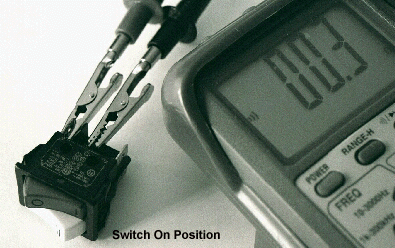
Attach the multi-tester leads to terminals 1 and 2. There should be no reading when the switch is in the off position (back). If you do, the switch is bad. When you activate the the switch forward (on), you should get a reading of approximately .3 OHMS. On analog multi-testers the needle will swing to the right near the 0 ohms. If you get no reading when the switch is in the on position, the switch is bad. There are two circuits to the lower switch, low heat and high heat. Place the test leads from the multi-tester on terminals 5 and 6. Flip the switch back to setting I. If you get no reading when the low heat switch is in the setting I position, the switch is bad. If you get a reading of approximately .3 Ohms, the low heat side (setting I)

of the switch is O.K. Perform the same test to the high heat (setting II) side of the (white) switch. Flip the switch to the front of the machine (setting II). Attach the leads of the multi-tester to terminals 4 and 5. If you get a reading of approximately .3 ohms, the high heat side (setting II)
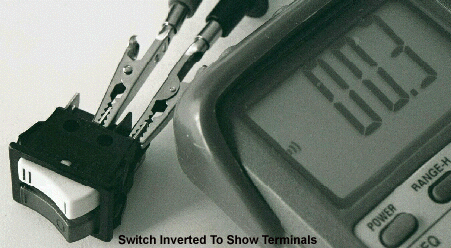
is O.K. If no reading, the switch is bad. Replacement of the switch is pretty straightforward. Disconnect all of the wires on the switch. Depress the plastic retainers and work the switch out. Purchase a new switch and reinstall. Note: In both positions (settings I and II), you should get readings because you're always applying AC to one part of the switch. There is no OFF position to the lower switch. If the switch checks out O.K., test the heating element.
NOTE: On Europiccola models with no pressure stat's there were two different switches installed on the machines. Both were two toggle switches but one has a white body (1970's & 1980's) and the other, the current black body switch. They are wired differently. Testing the white switch is the same process as above but the terminals are different. For terminal identification and OHM results click HERE.
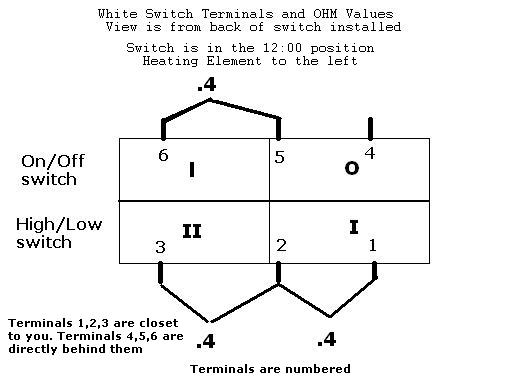
OHM results could range from .3 to.5. See VISUAL AIDS for additional diagrams.
CHECKING OUT THE HEATING ELEMENT
By the time you get to this part of the troubleshooting process, the heating element is probably the cause of your problems. Remove all wires from the four terminals on the heating element. If your machine has a pressure stat you'll only have two terminals on your element and two wires to disconnect. Make sure you make your wiring diagram so you can hook everything back up correctly. Also your heating element may be orientated differently than my picture or schematic. The wiring may not be the same, so go by your drawing to identify the right terminals. There is a rough wiring schematic in VISUAL AIDS. If you're using a self-powered test light, you may have problems on this test. The resistance in the low heat circuit is so high that the bulb may not light up or light very dimly. This may give you a false impression that the heating element is bad. To test the heating element, place your multi-tester leads to the proper terminals of the heating element. On the low heat circuit
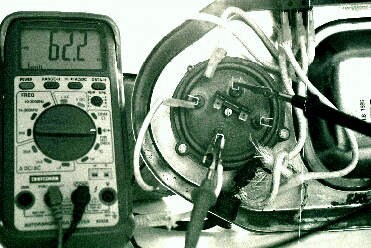
you should get a reading of approximately 62.2 Ohms. The high heat circuit
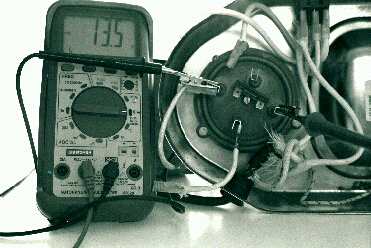
should have a reading of approximately 13.5 Ohms. If you don't get a reading on one or both circuits, the heating element is bad. Heating elements don't slowly burn out. Either you get a reading or you don't. There is an exception in that if you get very small OHM readings your element may be shorting out. The next paragraph discusses that in detail. On analog testers, the higher resistance, the less your needle will move to the "0" on the scale. If the heating element checks out to be O.K. your remaining problem could be a bad wire in the machine. These Ohm readings are for a 120 volt element. With a 230 volt element the above readings will probably be doubled. Multi-testers will also have a error percentage in their reading so take that into consideration. If the element is bad, click here on the Seal Replacement and read the Replacing the Heating Element section.
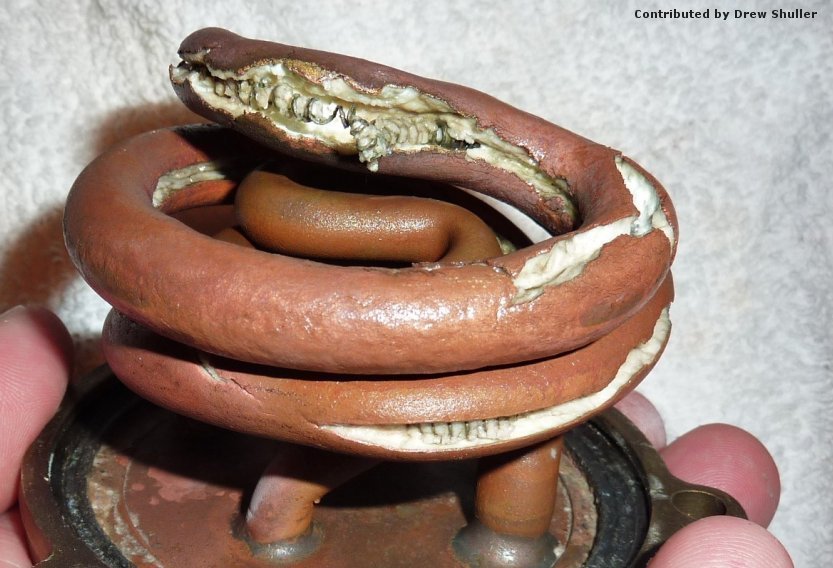
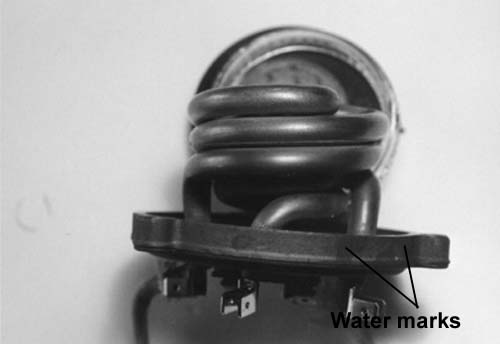
Even though your heating element shows some continuity there might be a chance that it is shorting out. The continuity test won't reflect this type of problem except that you won't get the readings as shown in the above paragraph. Probably the main cause of this short is that a pin hole has developed in one of the heating element coils and is allowing water to enter the inside of the coil and is coming in contact with the energized heating wire thus shorting out the circuit. This could be a sporatic occurance. If it is a small hole, it may take a while for the water to enter the coil to cause a problem. When the machine is turned off, the water inside the coil may have time to evaporate and or drain and not cause an immediate short when the machine is turned on in the future. This would be a hard problem to identify. My advice is, if all of your continuity checks out o.k. on the other components and your home circuit breaker is still flipping, consider the heating element as your problem. Looking for pin hole leaks in a copper element is almost impossible. The coils are wound too close together to do a through exam. In the stainless steel heating element the coils aren't wound that close together so you can give that element a closer examination. The other cause of a short might be one of the ceramic insulators around the rod where it comes out of the heating element may be cracked or missing allowing the rod to contact the heating element body itself causing the short. Another cause is the insulating material inside the coil itself has broken down over the years allowing the short to happen. This shorted heating element problem for the most part develops in older heating elements. This is another case for descaling your machine on a regular basis. At the end of this paragraph is a picture of an element that actually split apart because it was not descaled on a regular basis or if at all. The sediment had collected on the coils and the heat was not dissipated as it should have been and the outer sheath of the element actually split apart exposing the heating element wire and insulation. As soon as this happens the water comes in contact with the element wire and causes a short. So if your initial continuity test doesn't give you the OHM readings as discussed in the previous paragraph and it gives you very small OHM readings this is a good indication that the element is shorting out. This picture is an extreme heating coil failure
but even a small compromised portion of the element can have the same shorting out effect.
If you have an older machine that the heating element screws
on to the boiler, I have some bad news for you. You can not buy a replacement heating element and install it on your machine. The newer element does not fit correctly and you will have leaks. It is too expensive to buy a replacement boiler ($250). Even if a new element could fit you would have to buy a different retainer ring. You need this newer retainer ring so you can bolt on the new heating element. Your only alternative is to buy a new machine or a newer used machine. You'll know if you have a screw on element, there are 4 indentations or lugs on the circumference of the element instead of 3 bolts.
NOTE: I don't know if this is a rare problem, but it happened to me. I kept blowing fuses and when I took the bottom off my machine, the front was rusty. It looked like I had a small leak. Close examination showed that my element had warped
into a egg shaped pattern and cupped. I found this out when I tried to put a new gasket in the element. It wouldn't fit! Maybe that's why I had to go with a stainless steel element. Pavoni had discontinued the copper element. Maybe for cost-cutting, maybe for this problem. I don't know for sure. It's something to check out if you're having problems with leaks.
REMAINING CHECKS
If you got to this point, you may a have a bad wire in your machine. Look for any black or burned spots on the wires. If you have a bad wire, make up another new wire. This part will be tedious. Take each wire off, and check it for continuity. Even if the wire shows continuity but is burnt, I would still make up a new wire. Don't overlook this possibility if you are blowing fuses on a regular basis. If you smell something burning will also give you a clue. I did not cover checking out the pressure stat, mainly because I don't have one on my machine. There is a good possibility that it could malfunction and and cause a problem. My only suggestion is to call a la Pavoni parts dealer and see if they could give you instructions on how to test them. If anyone has knowledge on testing this part, please send me an e-mail and I'll add the testing procedure to the page. If everything checks out, and I hate to say this, take it to a electrical shop and let them diagnose the problem. I don't think you'll get to this point, and if you do, you haven't lost anything except some time.
TROUBLESHOOTING STEAM LEAKS
Most of the troubleshooting is pretty much common sense. If you see steam leaking out of the machine, the o-ring attached at that point is probably defective and needs replaced. Check all mating surfaces. If you have a buildup of hard water deposits, dried milk, or any other substance around the o-rings or gaskets, you have a possibility of a leak. If the seating surface has a gouge or deep scratch, the steam will work around the gasket. Steam will follow the path of least resistance. For people who have a second hand machine, look to see if the machine has been dropped or a part is deformed by abuse. You may have to do some close detective work to solve some of the problems you encounter. A small pin hole in a seam may have developed. Some leaks at the seams may be fixed by silver soldering. The only places that steam should be escaping is the pressure valve on top of the boiler, the steam arm, or aerator.
Deposits around the pressure relief valve
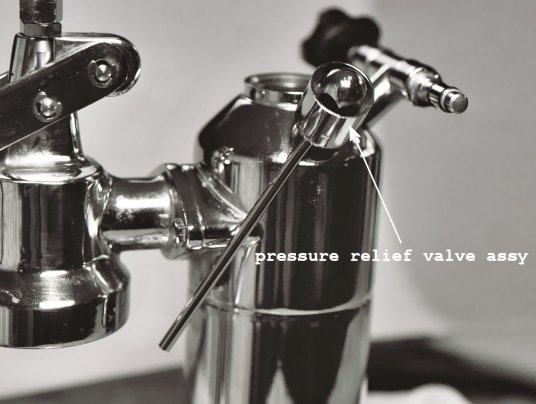
near the boiler indicate a loose fit probably due to a loose nut. This may have been caused by trying to remove the chrome nut of the valve assy without holding a wrench on the nut below the reservoir
or maybe by dropping the machine. I recommend taking off the whole assembly. Sorry, the heating element must be removed to do this repair. Unfortunately none of my 5/8" (16MM) wrench's could fit under the reservoir because they were too thick. I bought a cheap 5/8" wrench and ground down the wrench tip so it would fit under the reservoir and around the nut; Pavoni refers to it as a relief bolt. I used a belt sander with a 60 grit-sanding belt. If you don't have a belt sander, borrow one from one of your friends. I had to grind
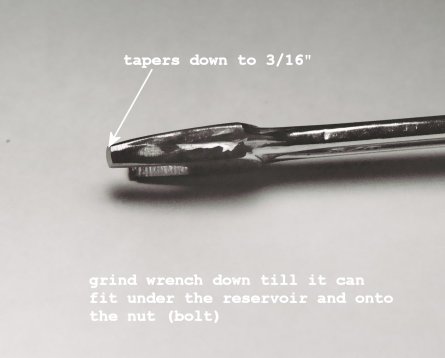
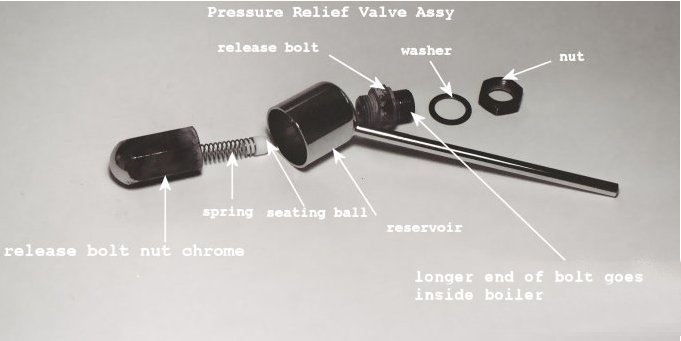
my wrench down to approx. 3/16" at the tip. Just grind yours down so it can fit around the nut (bolt). You could luck out and have a wrench that fits under the reservoir otherwise your going to grind a wrench. Another option is to go to a bicycle shop and buy a cone spanner wrench. They are made from flat stock and should fit easily under the reservoir. The first step after making up your special wrench is to remove the pressure relief valve portion that is outside the boiler. Hold your wrench on the nut (bolt) below the reservoir and place a 5/8" (16MM) socket on the chrome nut that fits inside the reservoir. Turn counterclockwise and unscrew the chrome nut. Inside the chrome nut is a spring and a seating ball. Different machines may have a different seating component. Mine is made out of a plastic type material that one end is rounded and the other end fits into the spring. Some machines have a round steel ball.
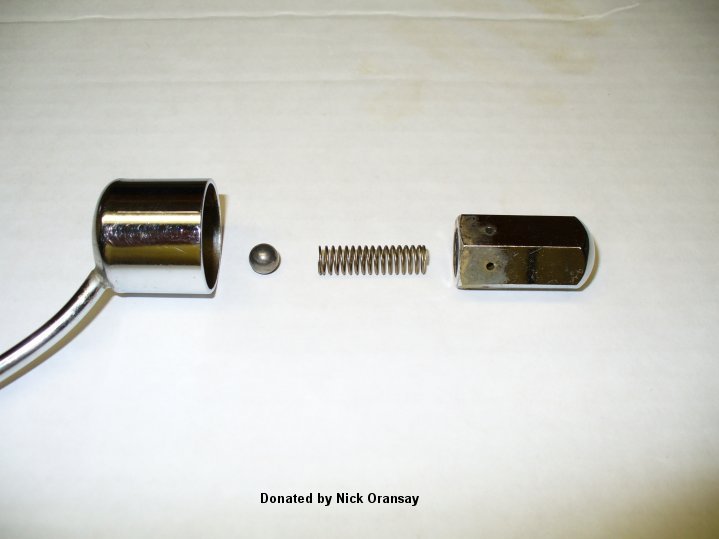
Remove the chrome nut, spring, and seating component, and reservoir. Now you just have the nut (bolt) remaining on the outside of the machine. Now comes the lousy part. Empty the water out of the boiler. Remove the base and unhook the wires on the heating element. Make sure you make up a drawing on the wiring configuration. Note the relationship of the heating element to the brass retaining ring. Take a felt pen and place a mark on the element and on the retaining ring opposite each other. This way, the element will be in the original position when you reinstall it. Unbolt the heating element. Now you need a 5/8" (16MM) socket, universal fitting, a straight extension, and ratchet to hold onto the nut inside the boiler. Make sure you locate the correct nut. There is another nut that holds the steam tee fitting in place. While holding the nut inside the boiler unscrew the nut (bolt) from the outside turning counterclockwise. Once the nut (bolt) is unscrewed, place all the components in some white vinegar to clean them up. Clean any deposits from the seating surfaces both inside and outside the boiler hole.
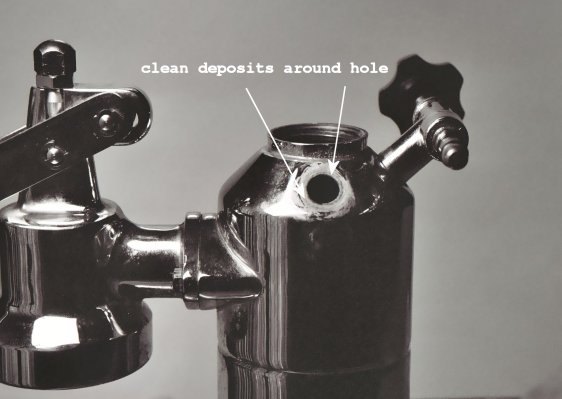
Soak a paper towel in some vinegar and place it over the hole. If the deposits have been there for a while, you may have to scrape some of them off. Be careful not to scratch the chrome or gouge the seating surface around the hole. You could use some 0000 (super fine) steel wool in helping to remove the deposits. Once you clean up all of the components you can reinstall the assy. This is the time to look for any problems with washers, etc. that may have been the cause of the initial problem. Getting the nut and washer in place under the hole was a little frustrating. I inserted a small screwdriver into the boiler hole. I put the washer and nut on my finger and then by going down the boiler knob hole, I slid the washer and nut onto the screwdriver. Then I held my finger on the end of the screwdriver. I slowly withdrew the screwdriver back out of the hole while keeping my finger on the tip of the screwdriver. Now the washer and nut should be directly under the hole. Hold them in place with your finger and screw on the longer end of the bolt into the boiler hole. Screw on hand tight and then use your socket to hold the nut from inside the boiler and tighten it from the outside, turning clockwise. Don't torque it down, just snug it up. Now place the reservoir onto the bolt. Place the spring and seating component inside the chrome nut. Slowly place the chrome nut over the bolt and insuring that the seating component is in contact with the beveled hole in the bolt. Screw on hand tight. Place your special wrench under the reservoir and onto the nut (bolt). Use a 5/8" (16MM) socket on the chrome nut and tighten clockwise. Remember, just snug it up! Reinstall the heating element. See Seal Replacement (Replacing the Heating Element) for details on reinstalling the heating element.
TROUBLESHOOTING MISCELLEANEOUS PROBLEMS
Machine doesn't cycle off when reaching operating temperature (Machines with Pressure stats)
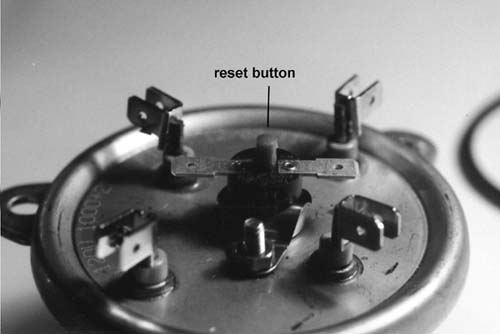
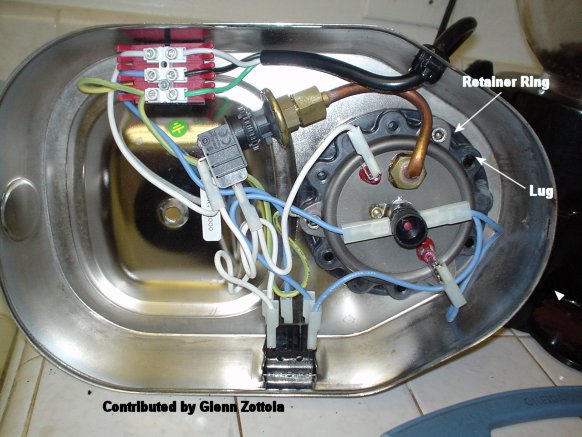
This applies to the machines that have pressure stats installed in the electrical system. Most Professional models have them and in the late 90's to present the Europiccola models have them. How do you know you have a pressure stat? Take the base off of the machine and look at the heating element. If there is a copper tube coming out of the bottom of the heating element and runs to a component that has two wires going to it, you have a pressure stat. The first check is to see if the tube has been clogged and is preventing the hot water from going to the pressure stat. If the water can't get to the pressure stat, it cannot sense how hot the water is and thus will not shut off the electricity to the heating element. The heating element will continue to produce heat and you then have the overheating condition. You will have to break the connection at the pressure stat with two wrenches. Empty the water out of the boiler before breaking the connection! Don't disconnect the tube at the heating element! If you do you will have to buy special sealant (See LINKS & PARTS) to apply under the tube flange to seal it from leakage. After the connection is broken take a pipe cleaner or wire and ream the tube to see if it is clogged. Flush with water. Be careful not to get any wiring wet when you flush the tube. You could put a small jar under the tube and pour water into the boiler to flush it. If don't want to use water, a can of compressed air would probably work to unclog the tube. If the tube was clogged, reconnect the tube to the pressure stat. Refill the boiler, check for leaks at the connection. If no leaks, turn the machine on again and see if it cycles off. If there was not a clog the pressure stat itself is probably defective. Take a multimeter and check for continuity at the pressure stat. Remove the two wires going to the pressure stat and do a continuity check. If no reading the pressure stat is bad and you need to buy a new one.
Water does not exit the Group when lowering the handle
This is generally caused by the piston unscrewing itself from the piston rod and blocking the water inlet. This is a fairly easy fix. Remove the piston from the Group and screw the piston back into the piston rod. Instructions on how to remove the piston are found in the SEAL REPLACEMENT section. The newer Ryton® plastic pistons
tend to do this more often than the brass pistons. It doesn't take much for the piston to unscrew to have a problem.
If you check the piston and it seems tight you may have another problem. Machines that have been left on too long or the boiler has been run dry can melt the plastic flange that the siphon tube is attached. Pavoni refers to this flange as a Group to Boiler Insert. I'll refer to it as a flange. The flange is located on the back of the Group. You have to remove the Group to have access to the siphon tube. Instructions on removing the Group are found in the SEAL REPLACEMENT section. After removing the Group the problem should be readily seen. The siphon tube
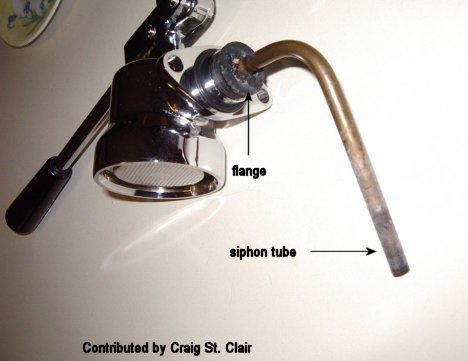
screws into the flange. The flange screws into the back of the Group. If the flange is melted or looks deformed buy a new flange and the problem should be solved. Other than running the boiler dry these two circumstances cause water not to enter the Group.
NOTE:To prevent the piston from unscrewing people have used Loctite® on the threads of the piston rod. I'm not sure if that is a good fix or not. I would use some Teflon® plumbers tape on the threads instead of the Loctite®. If the problem continues, the plastic piston can be replaced with the brass version.
Boiler turns on base
One problem that seems to be common is that the boiler assembly turns on the base. I think this caused by the gasket between the boiler and base shrinks, and in turn creates a slight gap. The solution to this is to take the base off the machine and tighten the brass retainer ring (flange) that the threaded base of the boiler screws into and also where the heating element attaches. You don't have to tighten the ring by much to solve the problem. You also have to be careful that when you tighten the ring, you also turn the heating element and the boiler. This is not too big of a problem since you only have to move the ring maybe at most 1/8 of a turn. You do need another person to hold the boiler in the correct position while you tighten the ring. There is probably a special wrench to tighten the ring but I used a small wooden block and a hammer. Put the wood block on one of the brass raised lugs
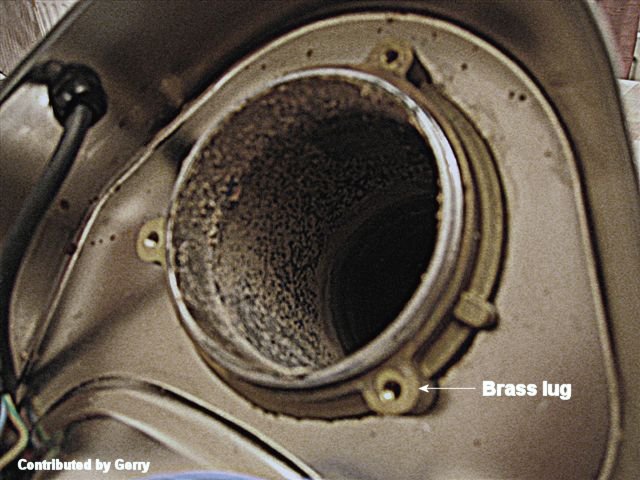
on the ring and tap the wood slightly in a clockwise fashion. Don't pound on the ring directly, it's only brass. Again, you don't have to tighten the ring that much to correct the situation. If this doesn't work, buy another gasket and add it to the assembly.
NOTE: This method of tightening the ring from below doesn't work exactly the same on the machines that were built after 1997. Pressure stats are now added to the Europiccola models. The brass retainer ring (flange) is now plastic. The plastic retainer ring (flange)
has sealant on it between the base and flange. Look at an angle and you can see the sealant between the flange and base. Make sure you empty the boiler of any water. Make a diagram on how everything is orientated or if you have a digital camera take a picture. You have to get the heating element back into the original position. The main concern here is to be careful that you don't bend the brass tube attached to the heating element. You have to get that tube attached to the pressure stat in the original position. You should disconnect the pressure stat at the tube connection not at the heating element. You'll need a couple of wrenches to undo the connection. Hold one wrench on the pressure stat brass flange and turn the other brass tube fitting counterclockwise to unscrew the fitting. Undo the wiring and remove the heating element from the retainer ring. The reason that you have to remove the boiler is that the gasket between the boiler and base has deteriorated and allowed the boiler to turn or the retainer ring itself has been deformed due to the heat. You'll probably have to purchase new gaskets, both boiler and heating element. You could try to add a new gasket or gaskets, screw the boiler back down and see how everything lines up. It would seem logical that it would but in the real world it probably won't so then you'll have to remove the retainer ring. Take your time to remove the ring. It may take a while to get the ring loose. I would make some marks on the base of the machine with a felt pen to designate where the threaded insert mounting holes are on the ring in relationship to the base.Take a wood block and place it on an angle to one of the lugs of the ring. Don't put it on the lugs that have a threaded insert. Tap the block lightly with a hammer in a counterclockwise fashion till it is loose. Don't use just one lug, alternate the wood block on different lugs while loosening. Unscrew the boiler from the base. Once the ring is off, clean up any residue on the base and ring. Put the boiler, with a new gasket, back in the base and and screw the boiler back into the retainer ring. I wouldn't use any sealant back on the ring. Apparently the thought was the sealant would keep everything tight but it seems like it doesn't work or you wouldn't have had a problem. In order to get the boiler and ring in the right position you will have to tighten the retainer ring all the way and see how it lines up with the original marks that you put on the base and how the boiler lines up with the base. You have to get the threaded inserts in the ring in the proper position. If they are not lined up correctly you will have to unscrew the boiler a bit, turn it, and then screw the retainer ring down again while turning the boiler back into position. Eventually everything should be lined up correctly. This is definitely a trial & error procedure. Then use a wood block and tighten the ring. The worst case scenario would be to cut the retainer ring off from the base and buy another one.
Broken handle on cup filter holder
After 6 years my handle developed a crack. After another year went by, the handle needed to be replaced. After trying to unscrew the handle, it shattered
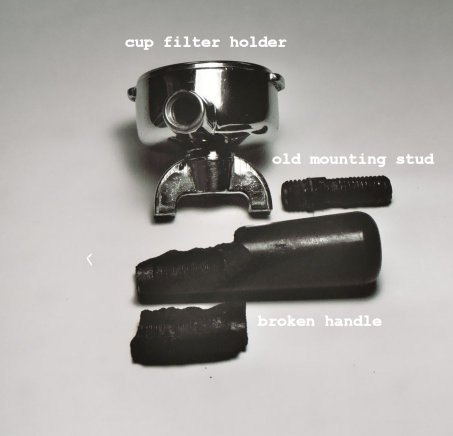
on me. Handles either screw on or slip on the mounting stud. Newer machines screw on the stud. The stud was so corroded that it also needed to be replaced. My advice is to get the handle off and examine the stud. If you have a slip on handle you will probably have to retrofit to the screw on handle. If the stud needs to be replaced try to remove the stud from the cup filter holder. This may be difficult since years of getting it wet from washing has probably caused it to rust. Use some rust removing solution on the stud where it goes in the handle. Squirt it between the stud and cup filter hole. Leave it soak for a day and then use some Vise-Grips® on the protruding end and put the cup filter holder in a vise. Turn counterclockwise and try to remove the stud. If the stud still refuses to unscrew, use some heat from a propane torch to help loosen it from the cup holder. Apply the heat to the cup filter where the stud enters. Then use Vise-Grips® on the stud. If you can remove it, great! If not, you will probably have to order a new cup filter holder, stud, and handle. Explain to the Pavoni dealer your situation and see if the new cup filter holder will fit your Group. If you successfully removed the old stud, order a new stud and handle. The new stud

will have one small threaded end and a larger threaded end. Older cup filter holders will accept the smaller end and the larger end screws into the handle. On the newer cup filter holders the hole in the cup holder and the hole in the handle are the same size. Screw the larger end stud into the cup filter holder and the smaller end goes into the handle. There is enough space in the handle to accept the smaller end while letting the larger threads engage the threads in the handle. The fit was kind of sloppy so I took some Teflon tape, that is used in plumbing applications, and wound of couple of turns of tape around the stud. I hope to protect the stud from rust by using the tape. The stud is expensive. If I had to do it all over, I would go to a good fastener store and buy a stainless steel metric hex bolt. Cut the bolt to length, bevel the edges, and use that as a mounting stud.
Water dancing on top of Group while pulling a shot
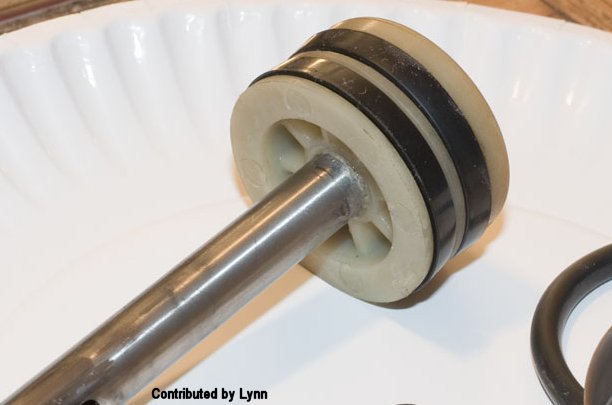
If you notice small amounts of water on top of the Group bubbling away while drawing a shot, your mini rubber gasket needs to be replaced. It's worn enough that water from inside the Group is allowed to travel between the piston rod and mini rubber gasket. It's hard to see the water escaping. You may see a drop of water hanging on the piston rod. See the Seal Replacement section for instructions on how to replace it.
Crunching sound and rough operation while lowering the handle
When you are drawing a shot and you hear a rough crunching sound it's probably due to wear on your lever inserts (pins)
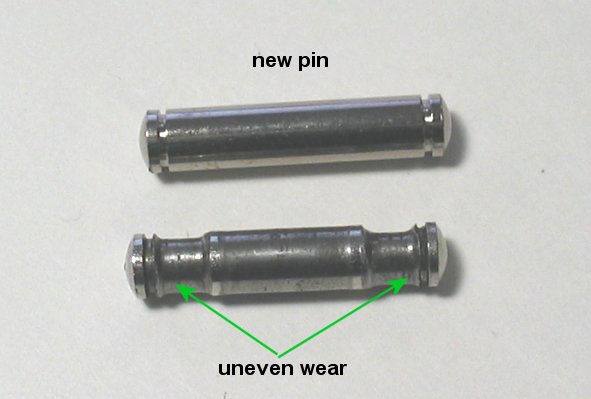
or the roller.
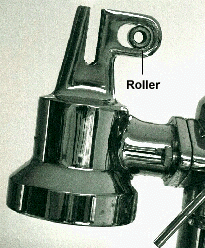
After so many years while you are lifting and lowering the handle, the lever inserts and roller will revolve and wear unevenly. Part of the handle does come in contact with the ends of the lever inserts. I don't see any reason for alarm but you can buy new lever inserts and roller to stop the condition. A little bit of lubricant on the pins and roller may help to reduce the wear. To replace them just slide the c-clips off the ends of the pins and replace them with new pins.
![]()
![]()
.jpg)
© 2010 Francesco Ceccarelli. All rights reserved.
Reproduction in any form without permission is prohibited.